Jordan Smith, builder and founder of the Smith House & Company, shares the best way to cut notoriously temperamental cement tiles to fit over a shower curb.
[Related: 18 STANDOUT TILE LOOKS FROM THE 2019 COVERINGS SHOW]
Cement tile has been popular for some time as consumers and home buyers gravitate towards the vibrant colors and and durability of the products. But the tiles are notoriously temperamental and difficult to install. In order to successfully install the cement tile, Smith says that builders must be sure to measure carefully. This means taking stock of not just the size of the shower curb, but also the backboard and the membrane between the board and the tiles to get the best fit.
[Related: WHAT ARE THE DIFFERENCES BETWEEN TWO TOP STEEL TYPES?]
Cement tiles are prone to chipping, so Smith says getting the angle of the cut right is necessary to make sure the tiles get the support they need not to crack. He also recommends a two cut method to avoid jagged edges.
Watch the video to see the whole process.
[Related: SEE WHICH 2019 TRENDS TRANSFORMED THIS MASTER BATHROOM REDESIGN]
Transcript:
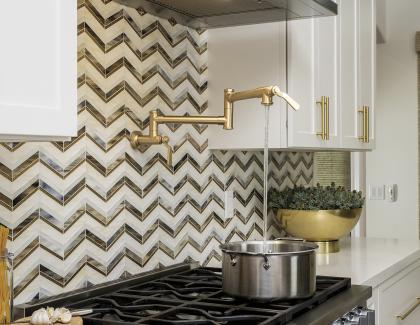
How do y'all? It's Jordan Smith. This is cement tile, and it is all the rage in all the magazines and in Pinterest and on house shows. Everybody likes it. We like it, too: it's a very long-lasting product. Today I am going to show you how to do a miter cut on this so that you can wrap this tile up over a shower curb. Let me show you what I'm talking about. Down here, so this shower curb we have the tile coming in, and have a full tile that is terminating up against the shower curb. And then we're having a half tile come up and not quite a half tile come back and then it wraps them back down this back side here. And if you see here this seam we built this curb specifically to make that break at this seam and it just makes a really pretty half tile up and around so it looks like the tile continues to flow through the room. And it gives a very nice minimal look to this shower curb now a couple of tricks when you're doing this. First of all if you want to make a shower curb match the size of tile that you have. You have to do a little bit of math; you have to make sure that the lumber that you if you use wood for the shower curb it's the wood plus you have your backer board on either side and on top of that wood and then you've got a membrane we used. An OD membrane that goes all the way over this to make sure that the whole thing is waterproofed before we put in our mud base. So you have to do all those calculations to make sure your heights all work out. Your heights and your wits all work out so you have a full half tile here and the width that you want right here.
[Related: WALL, FLOOR TILES STEAL THE SHOW IN THIS LUXURY MODEL HOME]
The second thing that you've got to look at is this is a very brittle product all tile is brittle, but concrete as much as it wears well if you install it right it's not a super tough product. It's very hard, but it will chip, and so if we don't take care of this mitre when you miter this back, you're cutting it at an angle. And that means that this edge here is completely unsupported underneath set for the grout in the middle so that grout we're using an epoxy grout epoxies: a two-part grout. So you have one part, and you mix in the second part, and you mix it all together and you're not waiting on it secured through moisture like concrete it actually cures through a chemical process with the two parts combining and creating a very hard polymer and that will keep this top this top tile supported so that when you're stepping on it as you're exiting the shower you won't chip it now the second reason that you have to look at it: the second reason that you're concerned about this tile chipping is when you're actually cutting it on the saw when you cut it at a ninety degree angle it has all of the material underneath it to keep this top glaze from chipping it's not really a glaze it's another type of concrete but it keeps this top from chipping when you cut it at an angle you no longer have that back support and it'll chip let's go out to the saw and I'll show you what I'm talking about and then I'll show you if it chips how to fix that to where you have nice clean smooth lines alright so we're out here at to the wet saw now usually you want to make all of your wet cuts outside because it does create a mess. Sometimes it doesn't make sense let's say you're doing an upstairs bathroom remodel and traipsing through a finished house outside to your salon backup to lay a tile will cause way more damage than just doing the cuts up there in that case you can do what we're doing here we've actually set up a ladder covered in poly and our spray from our saw comes back hits the poly and the water runs down into a roller pail or a roller pan down here at the bottom at the end of the day we're able to put the water in that pan take it out clean everything up and it makes a very nice clean up and keep style spray from going everywhere alright so here is our tile we're going to be cutting this at a 45 degree angle right here on this line now I'm going to make a mark here with a pencil and I'm just going to pretend like we've measured it out and it's exactly right there we want to make sure that when you make this cut that you take the line meaning you the the scrap piece that you're going to be throwing away the line stays on that side or right underneath the saw because if you don't you could wind up with your pencil mark on your bright white tile and that's difficult to get off there is a way with the sanding sponge but it's just better not to create the problem if you don't have to so this first cut I'm going to do will be just to cut the tile and because I have the the gray cement underneath the Portland cement on top it is going to create a nice clean cut that is supported by the tile beneath.
[Related: CHECK OUT THIS HOUSE'S RENOVATION INTO A CUSTOM CABINET PARADISE]
All right, so if you look at that I've got a nice clean cut all the way across, but now if I move this to a 45 degree angle I'm going to be able to make this same cut now I want to come just if you look here I'm cutting just underneath that Portland cement you just basically split the difference there on goes see how much my blade is hitting right there at that edge all right let me make let me make that cut I'm basically leaving the top Portland cement alone and I'm just taking the grey cement underneath off.
And now I've got this is mice and look how clean that edge is there now if it's chipped a little which it chips a little bit I can take this sanding sponge this is a trim Tech's sanding sponge about a 60 grit I like the trim Tex I didn't know any difference is just what I had in my toolbox and I used it I ran out of this stuff it went bad after lots and lots of tile and I went and bought a 3m product which I like 3m but in this case for some reason the trim Tex is a better sanding sponge if it's used in wet hard tile applications rather than sanding wood so just so you know trim Tech's not a sponsor of the show by the way just good product all right so then I'm able to do just a little cleanup here on this bevel and that takes those chips out and usually if I was laying this for in real life I would have a bucket here of clean water to clean all of this stuff off but I've got a nice pretty edge right there right and so my other piece let me show you let me cut another one and I'm going to intentionally do it wrong and I'm going to show you what happens if you do it if you do it wrong so let's pretend this isn't this isn't gonna match up on the pattern but let's pretend for the sake of time that this was the perfect one and I'm not going to do my pre cut to get my width and then just shave the concrete off of the top of the off at the bottom of the Portland and I'm just come around here and I'll show you the cut let's say that I'm just going to make this cut right down here without any pre pre cut.
[Related: SEE WHICH 2019 TRENDS TRANSFORMED THIS MASTER BATHROOM REDESIGN]
Look at that you see that jagged edge right here that jagged edge right there. I don't care how much sanding you do it's never going to make a really clean line because this is chipped more than this and it's going to make little waviness even if you spend all the time to say in that. So that's why I prefer to do the two cut method first cutting to my link and then trimming off to my 45 and then this is what it will look like here but obviously let me cut this again and I'll do it in a pretty way so we can see I'll do it I'll do it this way that way your pattern is line up and you can see what a pretty what a pretty bevel would look like right there now obviously you'll have a grout line on that you'll have these separated a little bit and you'll have color matching grout again epoxy epoxy grout line will keep that from chipping out but that's how you make a very clean non chipped concrete miter first cut your width and you have this back this this gray concrete as your backing material so this Portland cement on top doesn't chip out then turn your angle and stay completely away from this thin glazed area stay completely away from that and just cut the gray concrete away and use a sanding sponge to clean up any chips and you have a nice clean edge versus a super rough edge if you try to just lean it over and cut it I hope this helps I learned it on my own I searched the internet for all kinds of tips and tricks and unfortunately there's not a whole lot of stuff on seeing that tile so we're going to do a lot more videos on our experiences laying this if you're a DI and you're thinking about it don't probably I mean if you are like us and you like the challenge and you like figuring it out and you don't mind spending the time and you don't mind spending the money on the right tools and you don't mind researching on the internet a long time to figure out the best way of doing it knock yourself out but if you're just trying to save money go with a different tile go with something like this and we'll talk about this in a little bit this is a ceramic tile they make porcelain tiles with this same pattern it's cheaper it's easier to install it doesn't chip as bad it's not as pretty it's not handmade this is just a cheap imitation of the real stuff so I like the real stuff but if you're trying to save money the real stuff is expensive it looks great but it's gonna cost you a lot both in material and in labor so I highly recommend getting a professional to install this but I also highly recommend spending the money and figuring it out thanks so much for watching comment below all of you tile experts out there who are turning over to screaming at your computers, type what I'm missing, tell me an easier way to do this. Tell me what I'm missing! I'm always wanting to learn, and I know there's a ton of you out there who are experts in this field, so let me know any of your tips and tricks. if you have a question that you want me to answer on these videos, put that in the comments below like the video. If you liked it, subscribe, if we've earned it, and we'll see you next time on Jordan Smith Builds.
[Related: BUILT-IN STYLE: CUSTOM CABINETS ENHANCE A SPEC HOME]


Add new comment