
Kick-out diverters are a lost art, or at least well past their heyday. Despite being required in recent building code cycles, they are more often a novelty; at worst, they are installed incorrectly.
So why are these small sections of a roof-wall flashing system so important? Because water, above all, is your enemy. At any roof-wall intersection, the confluence of at least two different planes and often dissimilar materials creates the most vulnerable point for water intrusion from runoff and wind-driven rain at often inaccessible locations. Unchecked, that spells doom.
What’s more, proper roof-wall flashing is difficult to do. It requires training, strategy, and attention to detail. It’s a process of weaving multiple materials together in a precise way; one wrong step—or in this case, flash—and the possibility of a leak behind the finishes and into the structure becomes a real concern.
Paying close attention to these connections means making your roofer go the extra mile, probably at a premium, and watchdogging his work. And, of course, buyers expect a leakfree house, so there’s no extra credit for putting in the expense and supervision to ensure that level of quality.
Step-flashing a wall-roof intersection isn’t as charming as a little roof detail scabbed onto your façade, but it is an important step in the process if you want to keep water from sneaking behind it and creating the potential for latent waterrelated defects, including structural degradation and mold.
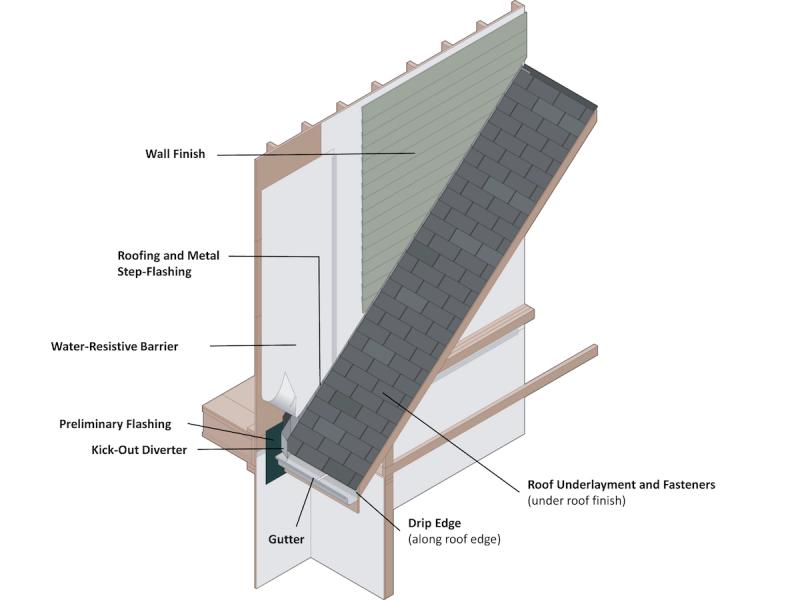
Image: IBACOS
Use the illustration above and follow this best-practices checklist to standardize your specs for a topquality roof-wall flashing job with a kick-out diverter.
- Drip edge: Install an uncut length of metal drip edge along the eaves and beneath the roof underlayment to protect the edge of the roof sheathing and fascia framing.
- Roof underlayment: Lap it shingle-style, a minimum of 2 inches horizontally and 4 inches vertically.
- Fasteners: Button-cap the heads of nails or staples that fasten the roof underlayment to mitigate moisture/water intrusion.
- Kick-out diverter: Install at the rake of the roof-wall intersection, extending 1½ inches beyond the roof edge (over the gutter) and fastened to the wall along its top edge only.
- Roofing and metal step-flashing: Weave (step-flash) each course of roofing with a corresponding sheet-metal flashing from the eaves to the ridge.
- Preliminary flashing: Install a single section of housewrap, self-adhesive roof underlayment, or other water-resistive barrier (WRB) behind the sub-fascia to serve as the foundational barrier; extend it at least 12 inches above and below the roof-wall intersection.
- Water-resistive barrier: Complete the WRB installation along the wall surface; cut along the slope of the roof, and use construction tape to secure the bottom edge to the top 3 inches of the metal flashing and diverter.
- Wall finish: Hold the wall finish (siding, stucco) at least 2 inches away from the roof surface to mitigate wicking.
- Gutter: Install the gutter from the wall and along the fascia, under the diverter.
Glenn Cottrell is managing director of the Builder Solutions team at IBACOS.
This piece originally ran as part of IBACOS's Quality Matter Series.


Add new comment